|
Main Index
Audio CD Input
Auxiliary Input
dBpowerAMP Music Converter
File Selector
DSP Effects and Volume Normalizing

Power Pack Settings
dMC
Configuration
dMC Windows Explorer Integration
dMC Tag Editing and Utility Codecs
Compression Codec Settings
DSP is short for Digital
Signal Processing, think of a DSP effect as altering the sound in some
fashion (for example you can alter the treble on a HiFi, DSP effects can
do this too with a Graphic Equalizer DSP Effect). dMC comes with advanced
and varied DSP effects, obviously you will not want to run them all, be
selective thinking of what final effect you are trying to achieve. DSP
effects are listed and explained alphabetically and later examples of
using multiple DSP effects are given.
To access DSP Effects from
dBpowerAMP Music Converter select DSP Effects, from Audio CD Input
select Power button >> DSP Effects:
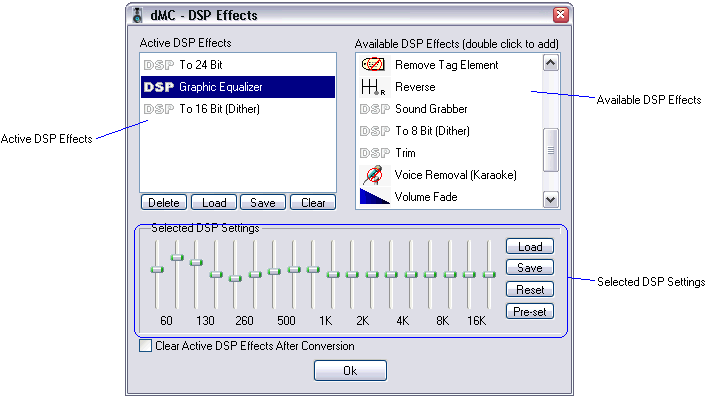
DSP Effects is split into 3
sections:
-
Available DSP Effects
lists DSP effects not being used, to select one to be used double click on
it and it is transferred into the left hand list,
-
Active DSP Effects are
the effects being used, when running effects dBpowerAMP works from
the top of the list to the end, the order is quite important for
certain effects. A selected DSP effect can be removed by selecting it and clicking Delete,
it will be moved back into Available DSP Effects.
-
One effect in the active
list can be selected, its settings are show in Selected DSP
Settings
Clear empties the
active list, Load and Save save the list (but not the
settings within each DSP effect). Clear Active DSP Effects After
Conversion is a one time setting (that auto unchecks for the next
complete conversion) that will set dMC to use any DSP effects after
conversion.
Available DSP Effects
-
Add Silence,
silence can be added of any length to the beginning or end of an audio
file,
-
Add Tag Element sets
a Tag element to be always written, taking priority over any tag value
already present, for example a tag element COMMENT (comment field
in ID3 Tag) of a certain value can be written to each file converted. A list of standard
Tag Elements is presented when Add is clicked,
-
Channel Move is
quite a powerful DSP effect, at its simplest any channel can be
moved (ie left channel moved) to any other channel. Set Channels
can be [as source] to leave he channel count as is, or be a fixed
number of channels, this can increase the channel count, or reduce it.
The option Combine dictates what happens when reducing a
channel count, for example going from 5.1 channel to 2 channel audio
present in the upper 4 channels can be Dropped (removed), or Added
/ Count (added together divided by channel count), Added or
added on a percentage. When increasing channel counts, Combine is
also used to determine how a new channel is created. Manually defined
channel moving take preference over combine,
-
Eden Swap care must
be used with this effect, it is only used rarely if the audio source
has the audio bytes swapped (ie certain Mac audio files),
-
Graphic Equalizer
works as it's physical counter part on a real Hi-Fi, certain frequencies
can be increased in loudness or reduced. Pre-set lists many
standard settings such as bass boost,
-
Looper can create
files of a certain length (looping audio content over and over to
create that length) or can loop an audio file a certain number of
times,
-
Maximum Length sets
the maximum length of an audio file, for example a whole bunch of full
tracks could be converted with a maximum length of 30 seconds to
generate preview files. If the length of an audio piece is below the
maximum length then it is left untouched,
-
Minimum Length
creates an audio file of a minimum length, extended as necessary with
silence at the end,
-
Music Removal removes
music from an audio piece, leaving just singing. This can only be
achieved if the audio is mastered with the singer singing into
a mono microphone, and the rest of the music is given a stereo effect
between the left and right channels. The voice can therefore be
isolated. How well this effect performs depends upon how the original
was recorded by the studio.
-
Remove Silence:
silence at the beginning or end of a rendition can be removed, care
must be taken to select a silence detection threshold that can detect
music, whilst at the same time remove silence noise hiss (from records
especially),
-
Remove Tag Element an
ID tag element can be removed, this option will only work when
'Preserve ID Tags' is used on the main option page, to remove all ID
tags from a file without recompressing look at
Utility Codecs,
-
Reverse takes an
audio file and reverses it, listen to those rock tracks for hidden
devil messages! ;)
-
Sound Grabber a
section of audio (either from beginning or end) can be grabbed, that
is saved as the converted file, for example grab 30 seconds worth of
audio 40 seconds from the end.
-
To 16 Bit (dither)
& To 8 Bit (dither) these two can take audio of a higher
bit count and reduce it at the same time dithering (theoretically will
create 17 bit audio when dithering from 24 bits to 16 bits),
-
To 24 Bit increases
the audio bit rate - note the quality is not increased, a 16 bit file
can be increased to 24 bits, but it will still be 16 bit quality, of
main use when using a Graphic Equalizer (see below), IMPORTANT
certain audio formats, such as mp3 will not accept 24 bit source
files,
-
Trim: a fixed
amount can be trimmed from either the beginning or the end. I
use it for those irritating audio tracks that seem to have 30 seconds
of irrelevant waffle / crowd cheering at the end - simply listen to
the track and make a note of where the waffle starts (say 30 seconds
from end), and trim,
-
Voice Removal Karaoke -
remove the voice from a recording (perfect for the sing-along-type),
this is only possible when the singers voice is positioned
centrally between the left and right speakers. How well this effect
performs depends upon how the original was recorded by the studio,
-
Volume Fade tracks
can be faded in (at the beginning) and out (at the end), enter the
time in mill seconds (seconds * 1000), the volume will fade over this
period,
-
Volume Normalize:
In layman's terms volume
normalize will make the sound level of any quieter recordings
louder, so when played with other recordings they all sound the same
loudness. A desired volume (in percentage of maximum) is set. Simple
Normalization will scan through the audio file, find the maximum
value (it might be 60%) then it works out how much it has to increase
the volume to get it to the desired value. Simple Normalization
generally works well, however there are a few situations which can
throw it - if you have a track that is only at 50% of max, except for
a few bits at the beginning (a pop from a record) that is 100%, then
simple normalize will leave the audio level untouched.
Adaptive Normalization can be
used to over come the problem of short loud sections, where the rest
of the track is quiet (perhaps a piece of classical music, that is
quiet until the drums at the end). Adaptive Normalization is
like having a friend constantly changing the volume control of your
stereo, turning it up and down as required. The Window size is the
length of track that is scanned ahead to work out the volume level, a
smaller window will result in more volume twiddling.
NB Volume Normalize only makes tracks
louder - it will not make tracks quieter,
- Volume Quieten lessens the volume
by a fixed percentage or dB,
- Write Silence at any position,
If using Graphic Equalizer then to
obtain the best possible quality (assuming the source is 16 bit from an
audio CD) then use these effects in this order:
To 24 Bit
Graphic Equalizer
To 16 Bit (dither)
what this does is to increase the bits
(does not increase the quality initially) of the 16 bit file, to 24 bits,
then running the Graphic Equalizer on a 24 bit file will give better
results dues ot the 24 bit depth, finally the 16 bit dither reduces the
bit range to the standard 16 bits, but dithering potentially gives 17 bit
audio (pseudo random noise creates this extra perceived depth). Graphic
Equalizer, Volume Normalize and Fade are the only DSP effects to benefit
from increasing bit rate when dithering back down.
File Selector
 Jump to Top
Power Pack
Jump to Top
Power Pack  |
|
