|
|
Auxiliary Input |
|
||||||||||||||
Auxiliary Input is used to record audio, recording can be an analogue recording of an LP, a digital recording (using SPDIF optical input on a sound card, if supported) of a Sony Mini disc, or even a recording of an audio track playing on your computer (if your sound card can record 'what you hear'). Recorded audio is saved direct into a compressed audio format (such as direct to mp3), audio recording can auto split tracks from an LP into separate files.
Getting
to Grips with Auxiliary Input
Follow my lead!, the best way of explaining how Auxiliary Input works is to show a complete tutorial recording an LP. Step 1 Connect Hi-Fi to PC
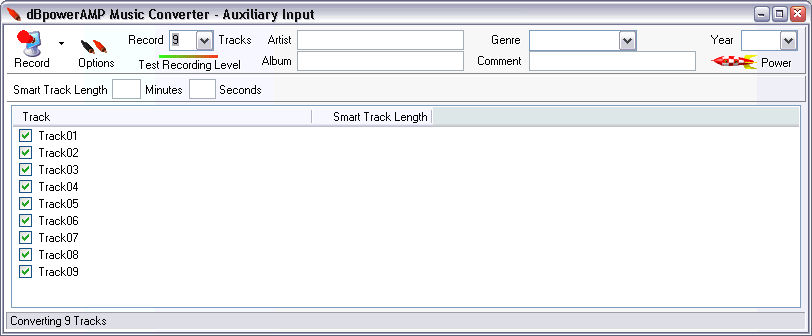
Step 2 Configure Auxiliary Input Start dMC Auxiliary Input program (Start Menu >> Programs >> dBpowerAMP Music Converter):
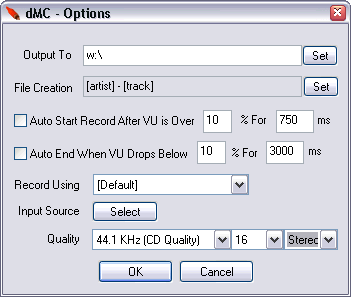
Straight away Options is clicked to setup Auxiliary Input to match your environment:
Taking sound cards and input sources first, Record Using lists all recording devices, be aware certain modems install as a device so it is worth setting this to your known sound card. After selecting Record Using choose which input will be recorded with Input Source, click Select and place a tick mark under the input to be recorded, if using the Line-In put a tick mark into the Select box under Line In. This Option page is explained in detail, for the purpose of this quick tutorial Set the Output To path where audio tracks should be saved, Auto Start and Auto End are ticked, these options listen to sound from the LP to determine when a track starts and ends and auto presses the record button, effectively auto-splitting a continuous recording into separate tracks. Click Ok to return from this option page. Step 3 Set the Recording Volume It is important that the
computer sound card and Hi-Fi are both set to correct volume levels (a PC
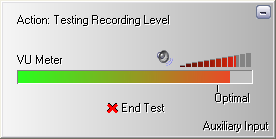
sound card has an optimal input volume), to begin this click
Set your recording source to play and the VU meter line should jump up and down (if not check your cable), the trick is to make the shown volume level on the VU meter so its maximum just reaches Optimal (as shown). First set the recording volume of the PC to maximum (click on the red volume scale), then change the volume of the recording source (HiFi) until optimal is reached. Remember that you will have to wait for the audio track to reach it's normal volume, it is no good setting the volume level on a quiet part of the track. When happy click End Test. Step 4 Recording With
preliminaries completed (steps 1-3 are a one time configuration),
recording can commence. Set Auxiliary Input to match the number of tracks
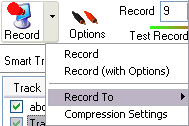
being recorded: The Record button starts the recording process, but before hand press the down menu to select which audio format is to be used:
Record To lists all compression codecs installed, and Compression Settings sets up any compression variables (such as bitrate to use). Press Record to start recording, if using Auto Start... and Auto End... from the options page wait until the message Waiting To Record.. is displayed before playing your LP.
Recording
Correctly
It is worth mentioning that if compressing to an audio type (such as mp3) your computer must be fast enough to compress in real-time, for mp3 this would mean about a 400MHz computer, if your computer is not fast enough, record to a fast lossless audio format such as Monkeys Audio then compress later. In an ideal world, setting Auto Start... and Auto End... with the default settings will work for all albums, but it will not (for example if you have an audio track with a quiet part in the middle Auxiliary input will think the track has ended and will move onto the next one). The Power Pack can help in those instances with something called Smart Track Length, if all else fails switch off Auto start and end and manually control the recording start and end (by clicking Record to begin and clicking again to end). As dBpowerAMP cannot reach out and pause your Hi-Fi, there are situations when dMC will be busy at the end of recording a track, whilst it is busy, the beginning of the next track will be missed, they are (and shouldn't be used):
Options page describes each option in detail, as well as how to best setup Auto Start.. and Auto End.. |
||||||||||||||||
![]()